Have you ever wondered how researchers properly reconstitute peptides while maintaining their quality and effectiveness?
Working with freeze-dried peptides can be challenging, especially for those unfamiliar with the preparation and mixing process.
Peptide reconstitution involves accurate measurements, sterile equipment, and careful handling to preserve the integrity of these compounds.
Even minor preparation mistakes can compromise peptide stability, interfere with research procedures, and produce unreliable experimental results.
Improper reconstitution may also lead to wasted materials, unnecessary expenses, and setbacks in ongoing laboratory studies.
In this guide, we’ll walk through the peptide reconstitution process, explore useful peptide calculators, and discuss proper storage practices to help maintain peptide stability.
What Is Peptide Reconstitution?
Peptide reconstitution refers to the process of dissolving lyophilized, or freeze-dried, peptide powder in a compatible solvent to create a liquid solution for laboratory applications.
Peptides are frequently supplied in powder form because removing moisture can improve their stability during transportation and storage. However, storage requirements vary depending on the specific compound.
Reconstitution transforms the dried material into a liquid solution by introducing an appropriate solvent under controlled conditions, allowing the peptide to dissolve and reach the intended concentration.
Bacteriostatic water is commonly discussed as a reconstitution solvent. It typically contains 0.9% benzyl alcohol, which helps inhibit bacterial growth. However, it is not suitable for every peptide formulation, and compatibility must be confirmed before use.
Correct reconstitution helps researchers achieve consistent concentrations while minimizing the risk of contamination, peptide degradation, and unwanted changes to molecular structure.
Step-by-Step Peptide Reconstitution Process
Proper peptide preparation requires appropriate equipment, accurate measurements, and sterile handling techniques. Before beginning, review the manufacturer’s protocol and ensure all necessary supplies are available.
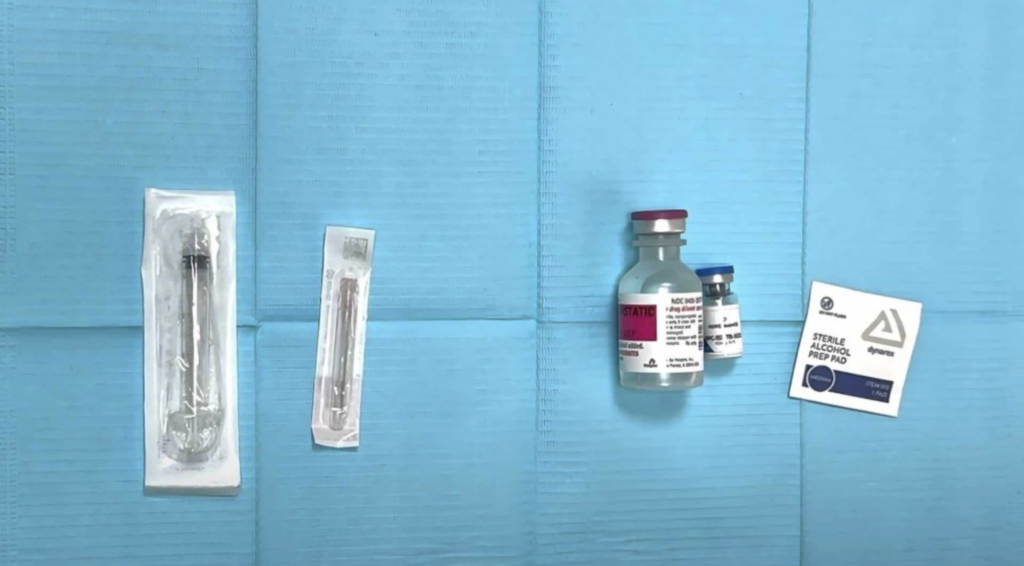
The table below outlines materials commonly associated with peptide reconstitution.
| Material | Specifications | Purpose |
| Peptide vial | Freeze-dried peptide powder | Holds the peptide material before reconstitution |
| Mixing syringe | Typically 1–3 mL, depending on the required volume | Measures and transfers the reconstitution liquid |
| Mixing needle | Gauge and length appropriate for the procedure | Allows access through the vial’s rubber stopper |
| Bacteriostatic water | Sterile water containing a preservative, when compatible | Serves as a diluent for appropriate peptide formulations |
| Alcohol swab | Individually packaged, single-use pad | Disinfects vial stoppers before access |
Step 1: Collect All Necessary Supplies
Start by gathering the equipment and materials required for your peptide reconstitution procedure.
Preparing everything in advance helps maintain an organized workflow and reduces unnecessary handling during the process.
Arrange the supplies on a clean, designated work surface, keeping sterile items properly packaged until they are needed.
Step 2: Prepare the Syringe and Needle
Carefully remove the syringe and needle from their sterile packaging, taking precautions to avoid contact with parts that must remain sterile.
If the equipment requires assembly, securely connect the needle to the syringe using the appropriate locking mechanism.
Keep the needle covered until the procedure requires its use. Follow the handling and aseptic preparation instructions specified for the equipment and formulation.
Step 3: Remove the Protective Vial Covers
Locate the plastic protective caps on the peptide vial and the approved diluent container.
Carefully remove these covers to expose the rubber stoppers underneath. The plastic caps can generally be discarded once removed.
Avoid touching the exposed stopper surfaces, as unnecessary contact can introduce contaminants.
Step 4: Disinfect the Rubber Stoppers
Use a fresh alcohol preparation pad to clean the rubber stopper on each vial before accessing its contents.
Pay particular attention to the central rubber area where the needle would enter.
Allow the disinfected surfaces to dry completely before proceeding. Proper disinfection is an essential part of reducing contamination risks during vial handling.
Step 5: Measure the Required Diluent
Determine the correct type and volume of solvent using the peptide manufacturer’s validated reconstitution instructions.
The selected volume affects the final concentration, so measurements should be checked carefully before any transfer occurs.
When using a syringe, follow the product’s specified sterile transfer method and ensure that the intended liquid volume is measured accurately.
Step 6: Transfer the Diluent Into the Peptide Vial
Once the appropriate amount of compatible diluent has been measured, it can be transferred to the peptide vial according to the validated preparation procedure.
Certain peptide formulations require the liquid to be introduced gently to limit foaming or unnecessary disturbance of the powder.
The mixing technique, transfer method, and required volume must be consistent with the instructions for the particular peptide. Do not assume that the same process applies to every formulation.
Step 7: Allow the Peptide to Dissolve
After the diluent has been added, allow the peptide to dissolve using the mixing method recommended by its manufacturer.
Some formulations may permit gentle swirling or rolling of the vial, rather than vigorous shaking.
Depending on the peptide, dissolution may take several minutes. A four-minute mixing period is sometimes described in general tutorials, but it should not be treated as a universal requirement.
Avoid aggressive mixing unless specifically directed, because some peptides can be sensitive to mechanical stress.
Step 8: Inspect and Store the Reconstituted Peptide
Once the mixing procedure is complete, examine the solution to determine whether it matches the expected appearance described in the product instructions.
Unexpected particles, discoloration, cloudiness, or incomplete dissolution may indicate that the preparation should not be used.
After reconstitution, store the solution under the recommended conditions to help maintain its stability and suitability for the intended research application.
Some peptides require refrigeration, while others have different temperature or light-protection requirements. Always follow the product-specific storage instructions rather than assuming a standard storage temperature or shelf life.
Video Tutorial
For an additional visual reference, Movement Clinic provides a video demonstration discussing peptide reconstitution and common preparation techniques.
Using Peptide Reconstitution Calculators
Peptide reconstitution calculators can simplify concentration calculations and help researchers check measurements before preparing a solution.
These tools generally use information such as peptide quantity, diluent volume, and target concentration to perform mathematical conversions.
Below is the best peptide calculator that provides peptide-related measurement features for free
Peptide Calculator Free
Peptide Calculator Free offers an accessible way to calculate peptide concentrations and convert measurements.
Users can enter the total amount of peptide in a vial, the quantity of diluent added, and a specified target amount to calculate the corresponding solution volume.
Its automated calculations can help reduce arithmetic mistakes and make concentration conversions easier to understand.
Important Note: These calculators are included as informational resources and are not sponsored recommendations. Their accuracy and suitability have not been independently verified. Calculator results should never replace manufacturer instructions, validated laboratory procedures, or guidance from a qualified healthcare professional when medication is involved.
Wrapping It Up
Understanding peptide reconstitution is an important part of maintaining accuracy and consistency in laboratory research.
Following established preparation procedures can help researchers minimize avoidable errors and protect the integrity of valuable experimental materials.
Reliable results depend on appropriate sterile handling, accurate concentration calculations, and correct storage practices.
As researchers become more familiar with these principles, they can develop more consistent workflows and improve the reproducibility of their studies.
Keep in mind that peptides differ in their chemical properties, compatibility requirements, and stability profiles. Always consult the specific manufacturer’s instructions before preparing any formulation.
Ultimately, the quality of peptide preparation can influence the reliability of research findings. Paying attention to each stage of the process helps ensure experimental materials are handled with the appropriate care and precision.
What challenges have you encountered when preparing or reconstituting peptides for laboratory research?

The information on this page is not intended to be a replacement for treatment, diagnosis, or professional clinical advice. We do not recommend taking any action without consulting with a qualified mental health professional. If you are in a crisis or any other person may be in danger - don't use this site. These resources can provide you with immediate help.
Related Articles